


How to repair the scratch corner and the torn-off corner for the leather handbag. (Rewrite 1)
- Sep 2, 2025
- 2 min read
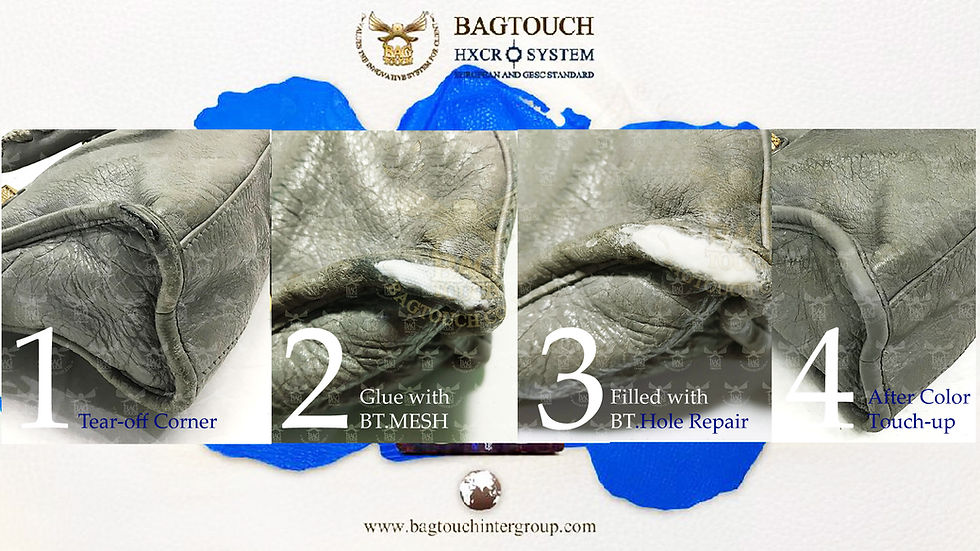
The scratched corner of handbags, including the tear-off corner of handbags, is so much effect on the resell market price. However, if you know how to fix the scratch and the tear-off corner of the handbags then you can pick the right handbag to restore and resell them at a higher rate. Here is the complete procedure.
1. Clean the whole handbag in case the customer requires you to do the cleaning for the whole bag and fix the scratch corner but if the customer requires only fixing the scratch corner, then you can skip the general cleaning procedure.
If you are not so sure what the general cleaning product and procedure then click the link here!
2. Clean the damaged corner with BT.Coating Remover and BT.Polyester sealant wiper (Lint-free cloth). Try to minimize cleaning around the torn-off corner.


3. If the damaged corner is just a deep scratch then you can fill BT.Hole repair right away but if it tears off, it means the damaged corner of the handbag has no base. In this case, you need to build a base by using TK.Mesh and BT.20 second leather glue or BT.Water Base Glue to glue the little piece of TK.Mesh underneath the torn-off area before fill with BT.Hole repair above the glued mesh.
4. Use a hair dryer on a warm setting until the surface is completely dry. While a heat gun may be suitable for leather furniture, its intense heat poses a significant risk of damage to handbags, which are often made from a variety of materials.
When the product dries, it will contract. Repeat steps 3 and 4 until the filled area is level with the surrounding surface. Then, sand it down with 1500 to 2000 grit sandpaper until the repair is smooth and has the original piping's shape.
6. The final round of filled, adding the BT.Standard color with going to use for color touch-up for a drop. To change the white color of BT.Hole repair to the closest color of the leather. Because in the end, we are going to touch up the color over the filled area, to change the color of the BT.Hole repair to be closer to the exact color will help it easier.
7. If the leather has grain then use BT.Pattern Molding Set to stamp on damp BT.Hole Repair at the final round.


8. Do the color touch-up but at this stage, no need BT.Coating Remover because we already clean the area and start with BT.Color Base, BT.Stardard Color + BT.Stardard Color Dilute and Seal the color with BT.Color coated also to adjust the shininess to be as the original at the same time. All mentioned you can get in 1 set of BT.Recoloring start-up set.

It might look complicated but when you are doing it and get understand it, that is easy and worth your time when the return is a profit. Do you agree that "Practice making perfect"


Comments